Muellermobile Build Notes:
This site contains affiliate links, including those from Amazon. As an Amazon Associate, we earn from qualifying purchases. This means that if you click on an Amazon link and make a purchase, we may receive a small commission at no extra cost to you.
These commissions help support the content on this site, allowing us to continue providing valuable information and recommendations. We only link to products we genuinely trust and believe will add value to your experience.
Floors, Walls, Ceiling
This project was a little different than our usual work. This van was built out by Vandoit in 2022 and after removing the factory headliner and flooring, we did a full overhaul of the van’s interior.
Floor:
The first step for this van was demolition. We removed the factory Ford flooring and seats that showed up with the van. Next we installed our 3/4” marine grade plywood sourced from National Wood Products for the subfloor.
We scuff the high points of the corrugated van floor with an abrasive and use Sikaflex-252 to stick our CNC cut marine grade plywood to the van floor.
Like a lot of the vans we work on, this client opted for a luxury vinyl plank flooring. We like the comfort, durability, and easy cleaning of waterproof LVP options. The style this client chose was Lifeproof Sundance Canyon Hickory.
The final step on the floor is trim. We used a 1” x1'/8” wall aluminum angle that we source from Alreco Aluminum in Henderson, CO to cover up the plywood and floor edges.
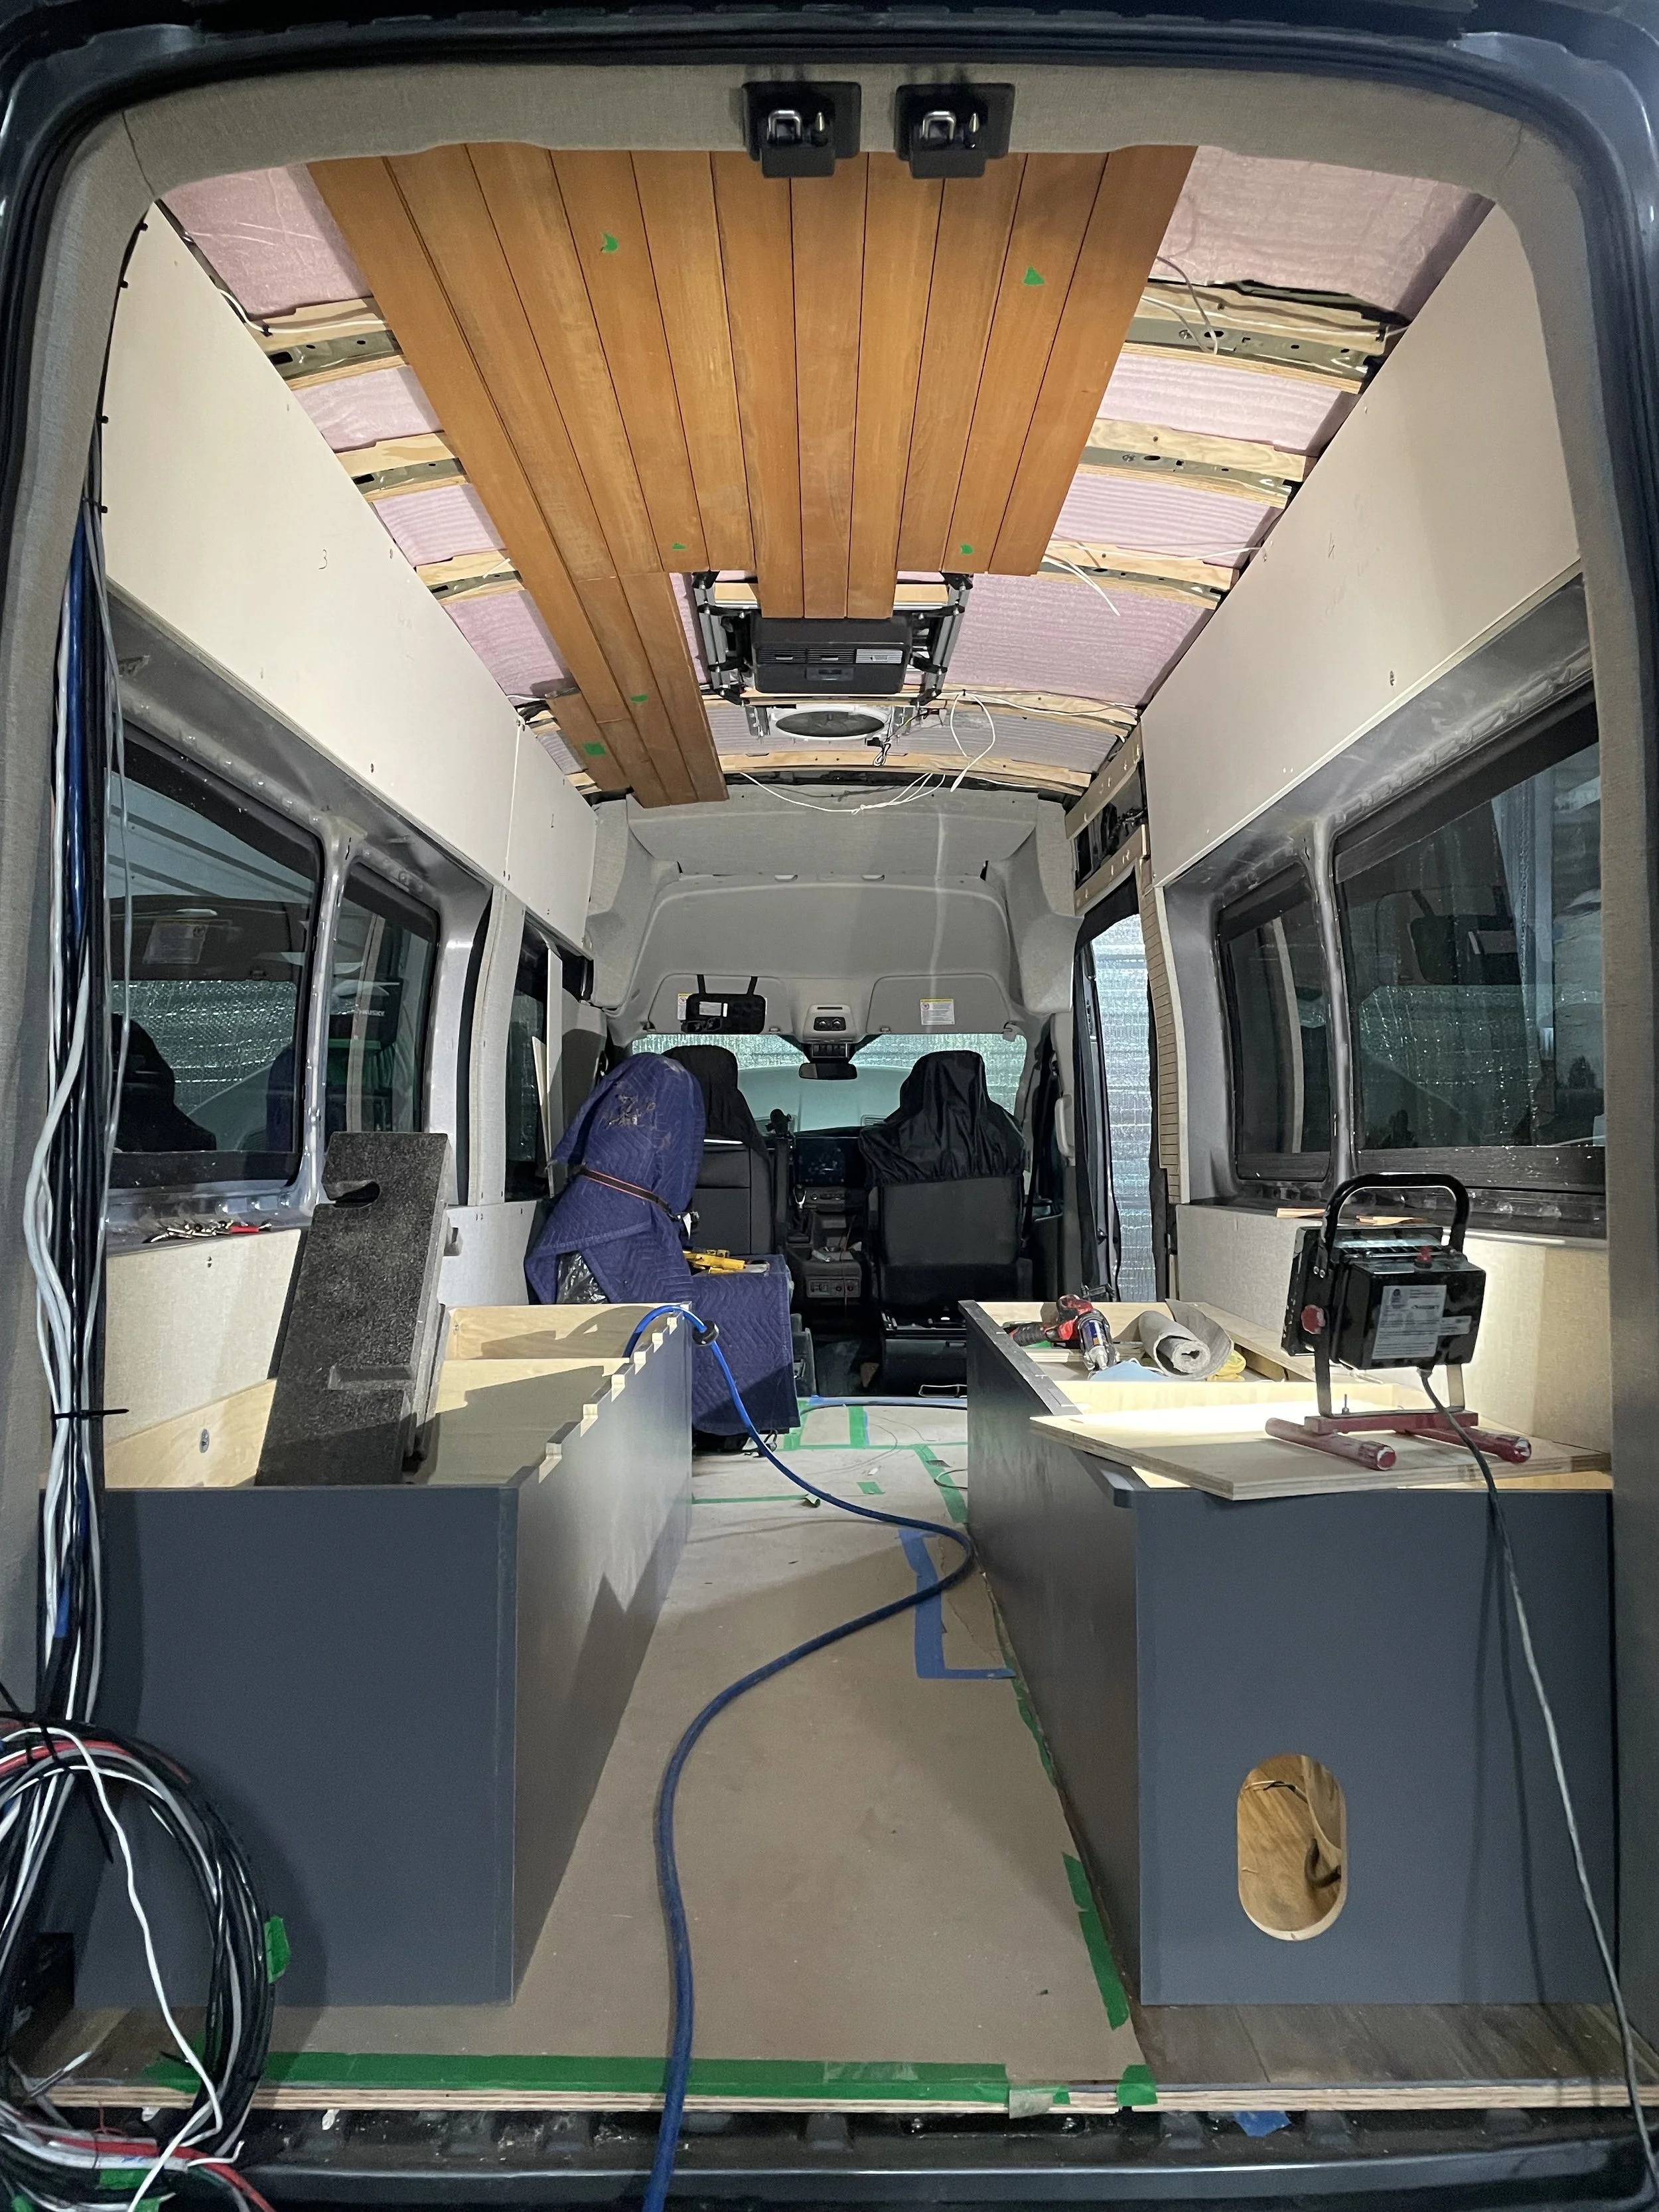
Walls: First step on the walls is to pack everything with insulation.
We used the DEI Precut Insulation Kit for 148” Transits on this van to help maintain temperature inside the van. For whatever reason, Transit's have some spots on the walls that are near impossible to drill through. Because of this, we have started to frame out the walls with 3/4” plywood to make our panel installation easier. Since this van had windows all around, we incorporated sills into our framing that planed out with our panels for a seamless look. Once insulation is in, cable has been pulled behind the walls, and we got our framing in place, we install our wall panels with 35mm panel bolts and wood inserts installed into the framing.
Our wall panels on this van were made of 1/4” PVC foam board. PVC foam board is a little more durable than plywood and holds a screw better. We always upholster our wall panels with 1/8” closed cell foam and this van was finished with Marathon Tweed Grey Mix fabric.
We also wrap the metal thresholds in our vans, so we used the same foam and Marathon fabric for the slider and rear door openings to cover up all the van’s sheet metal and give it a cozy feel.
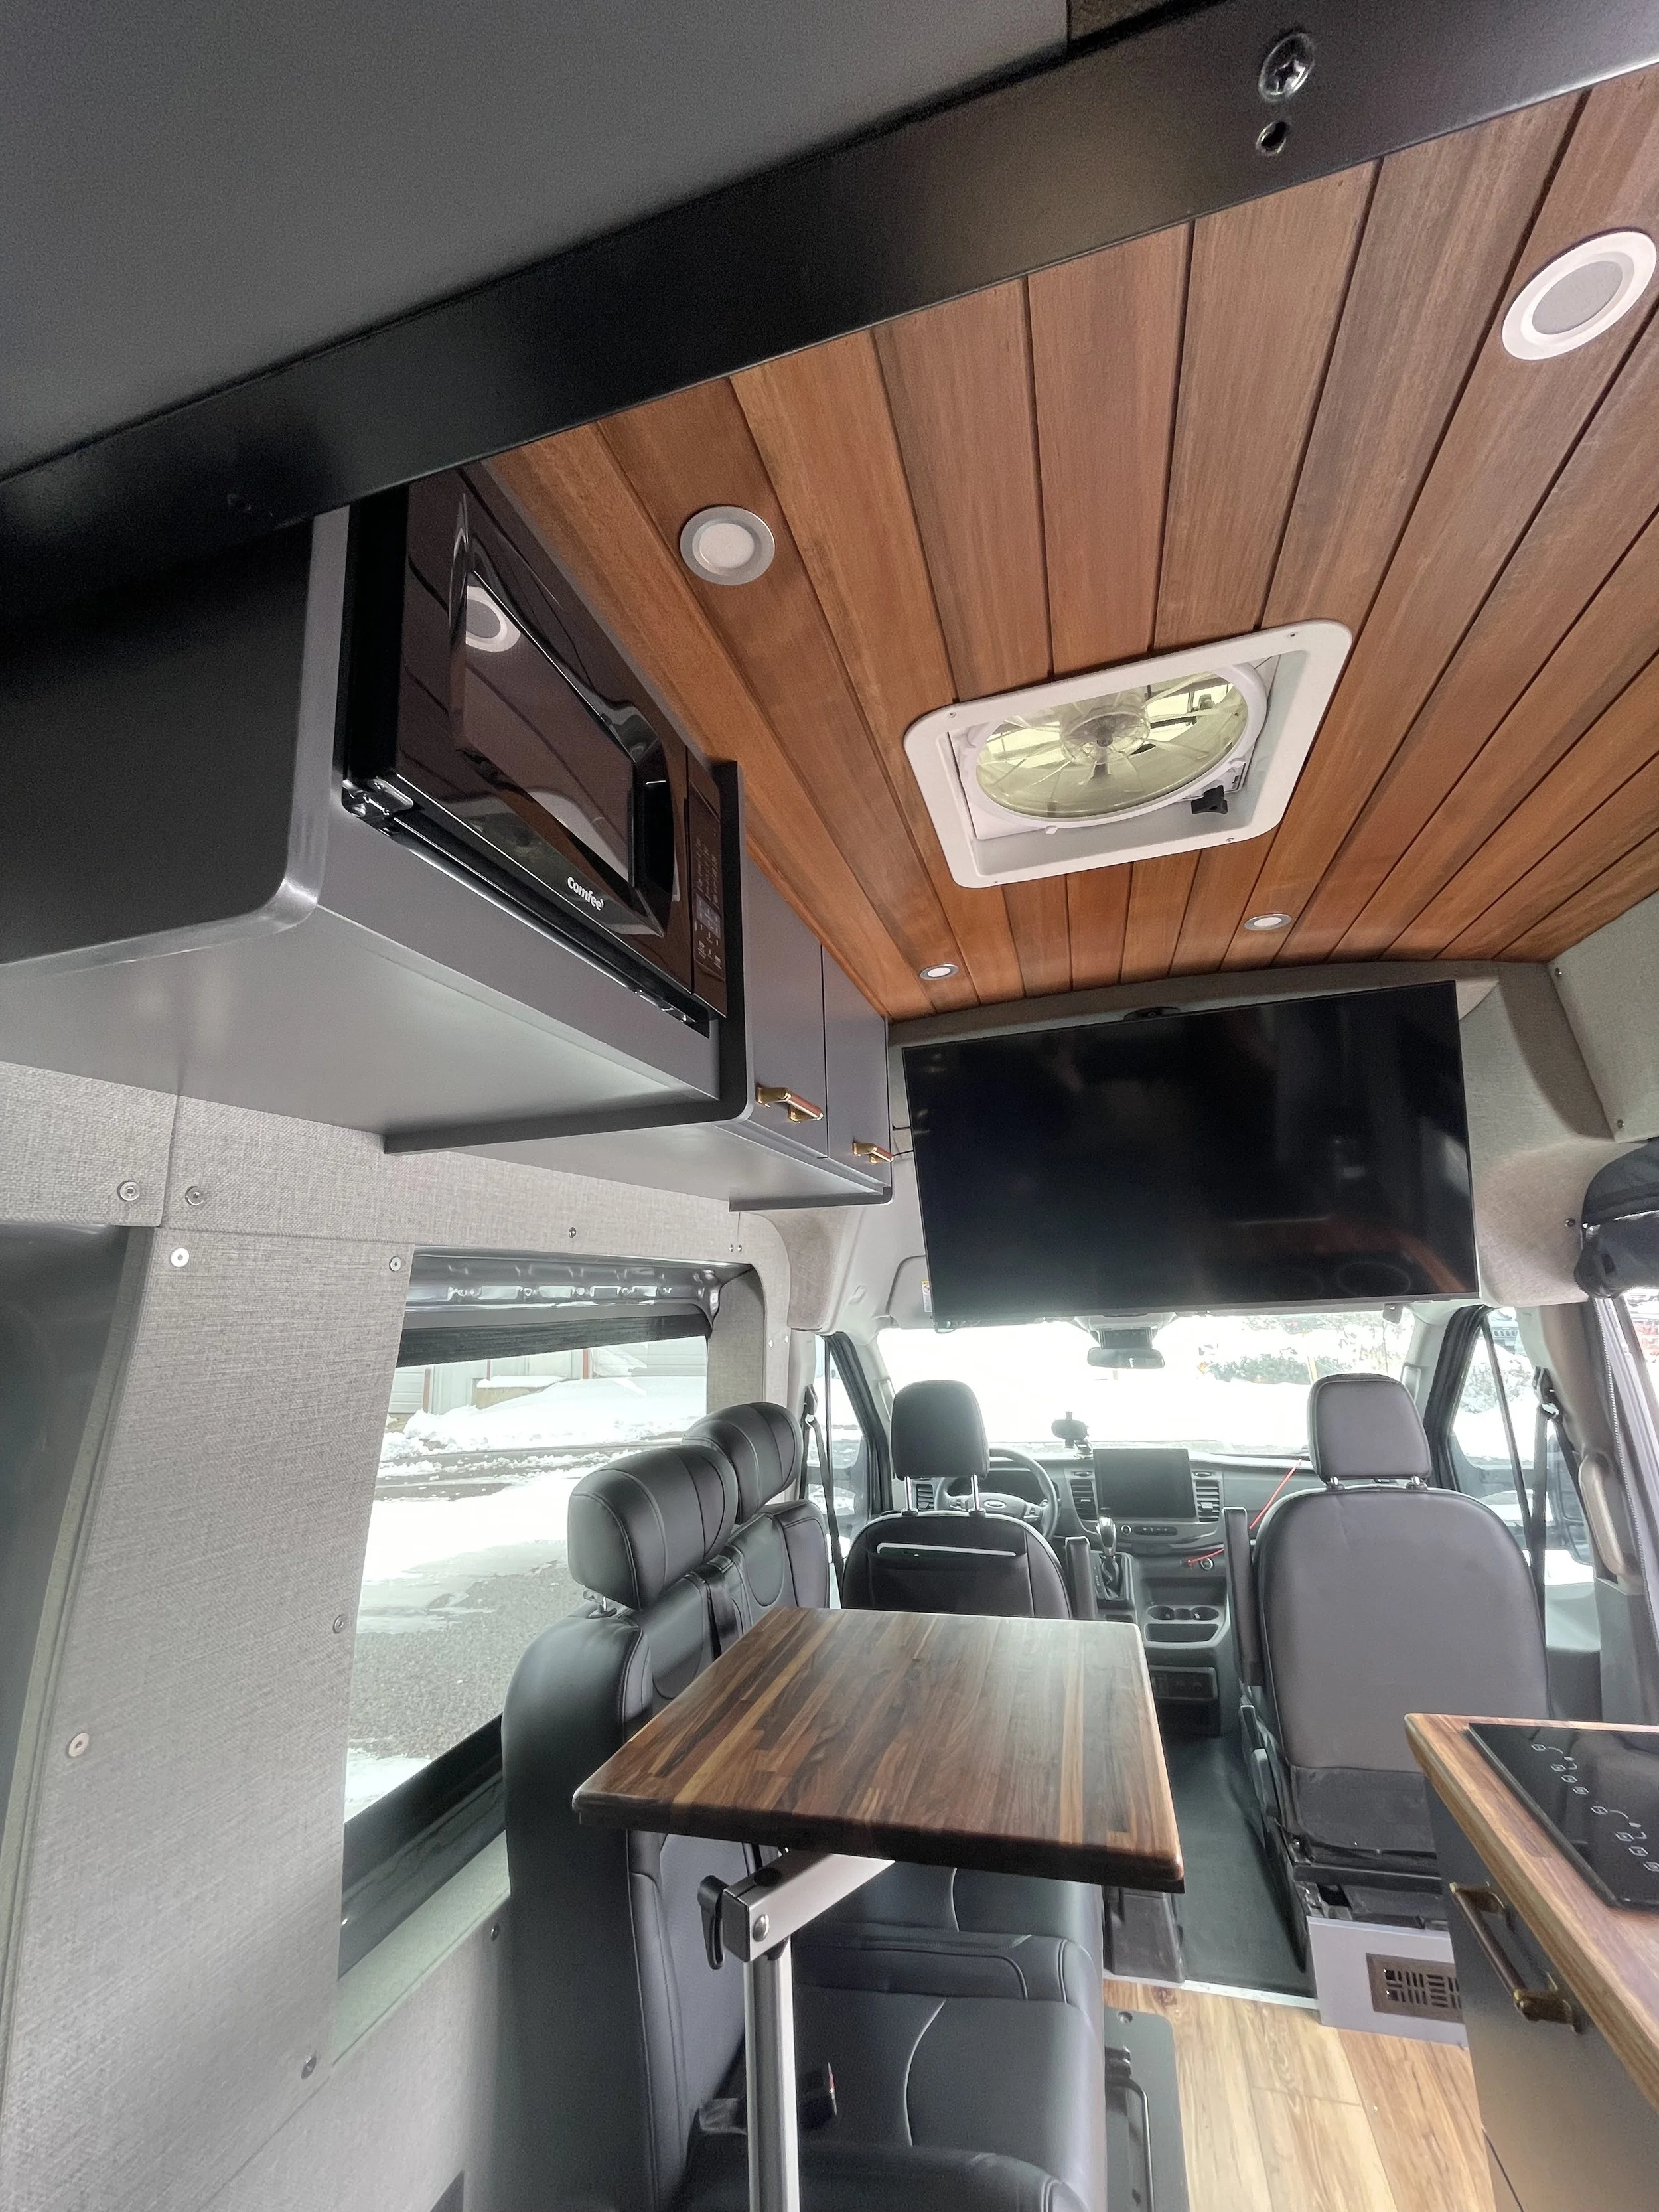
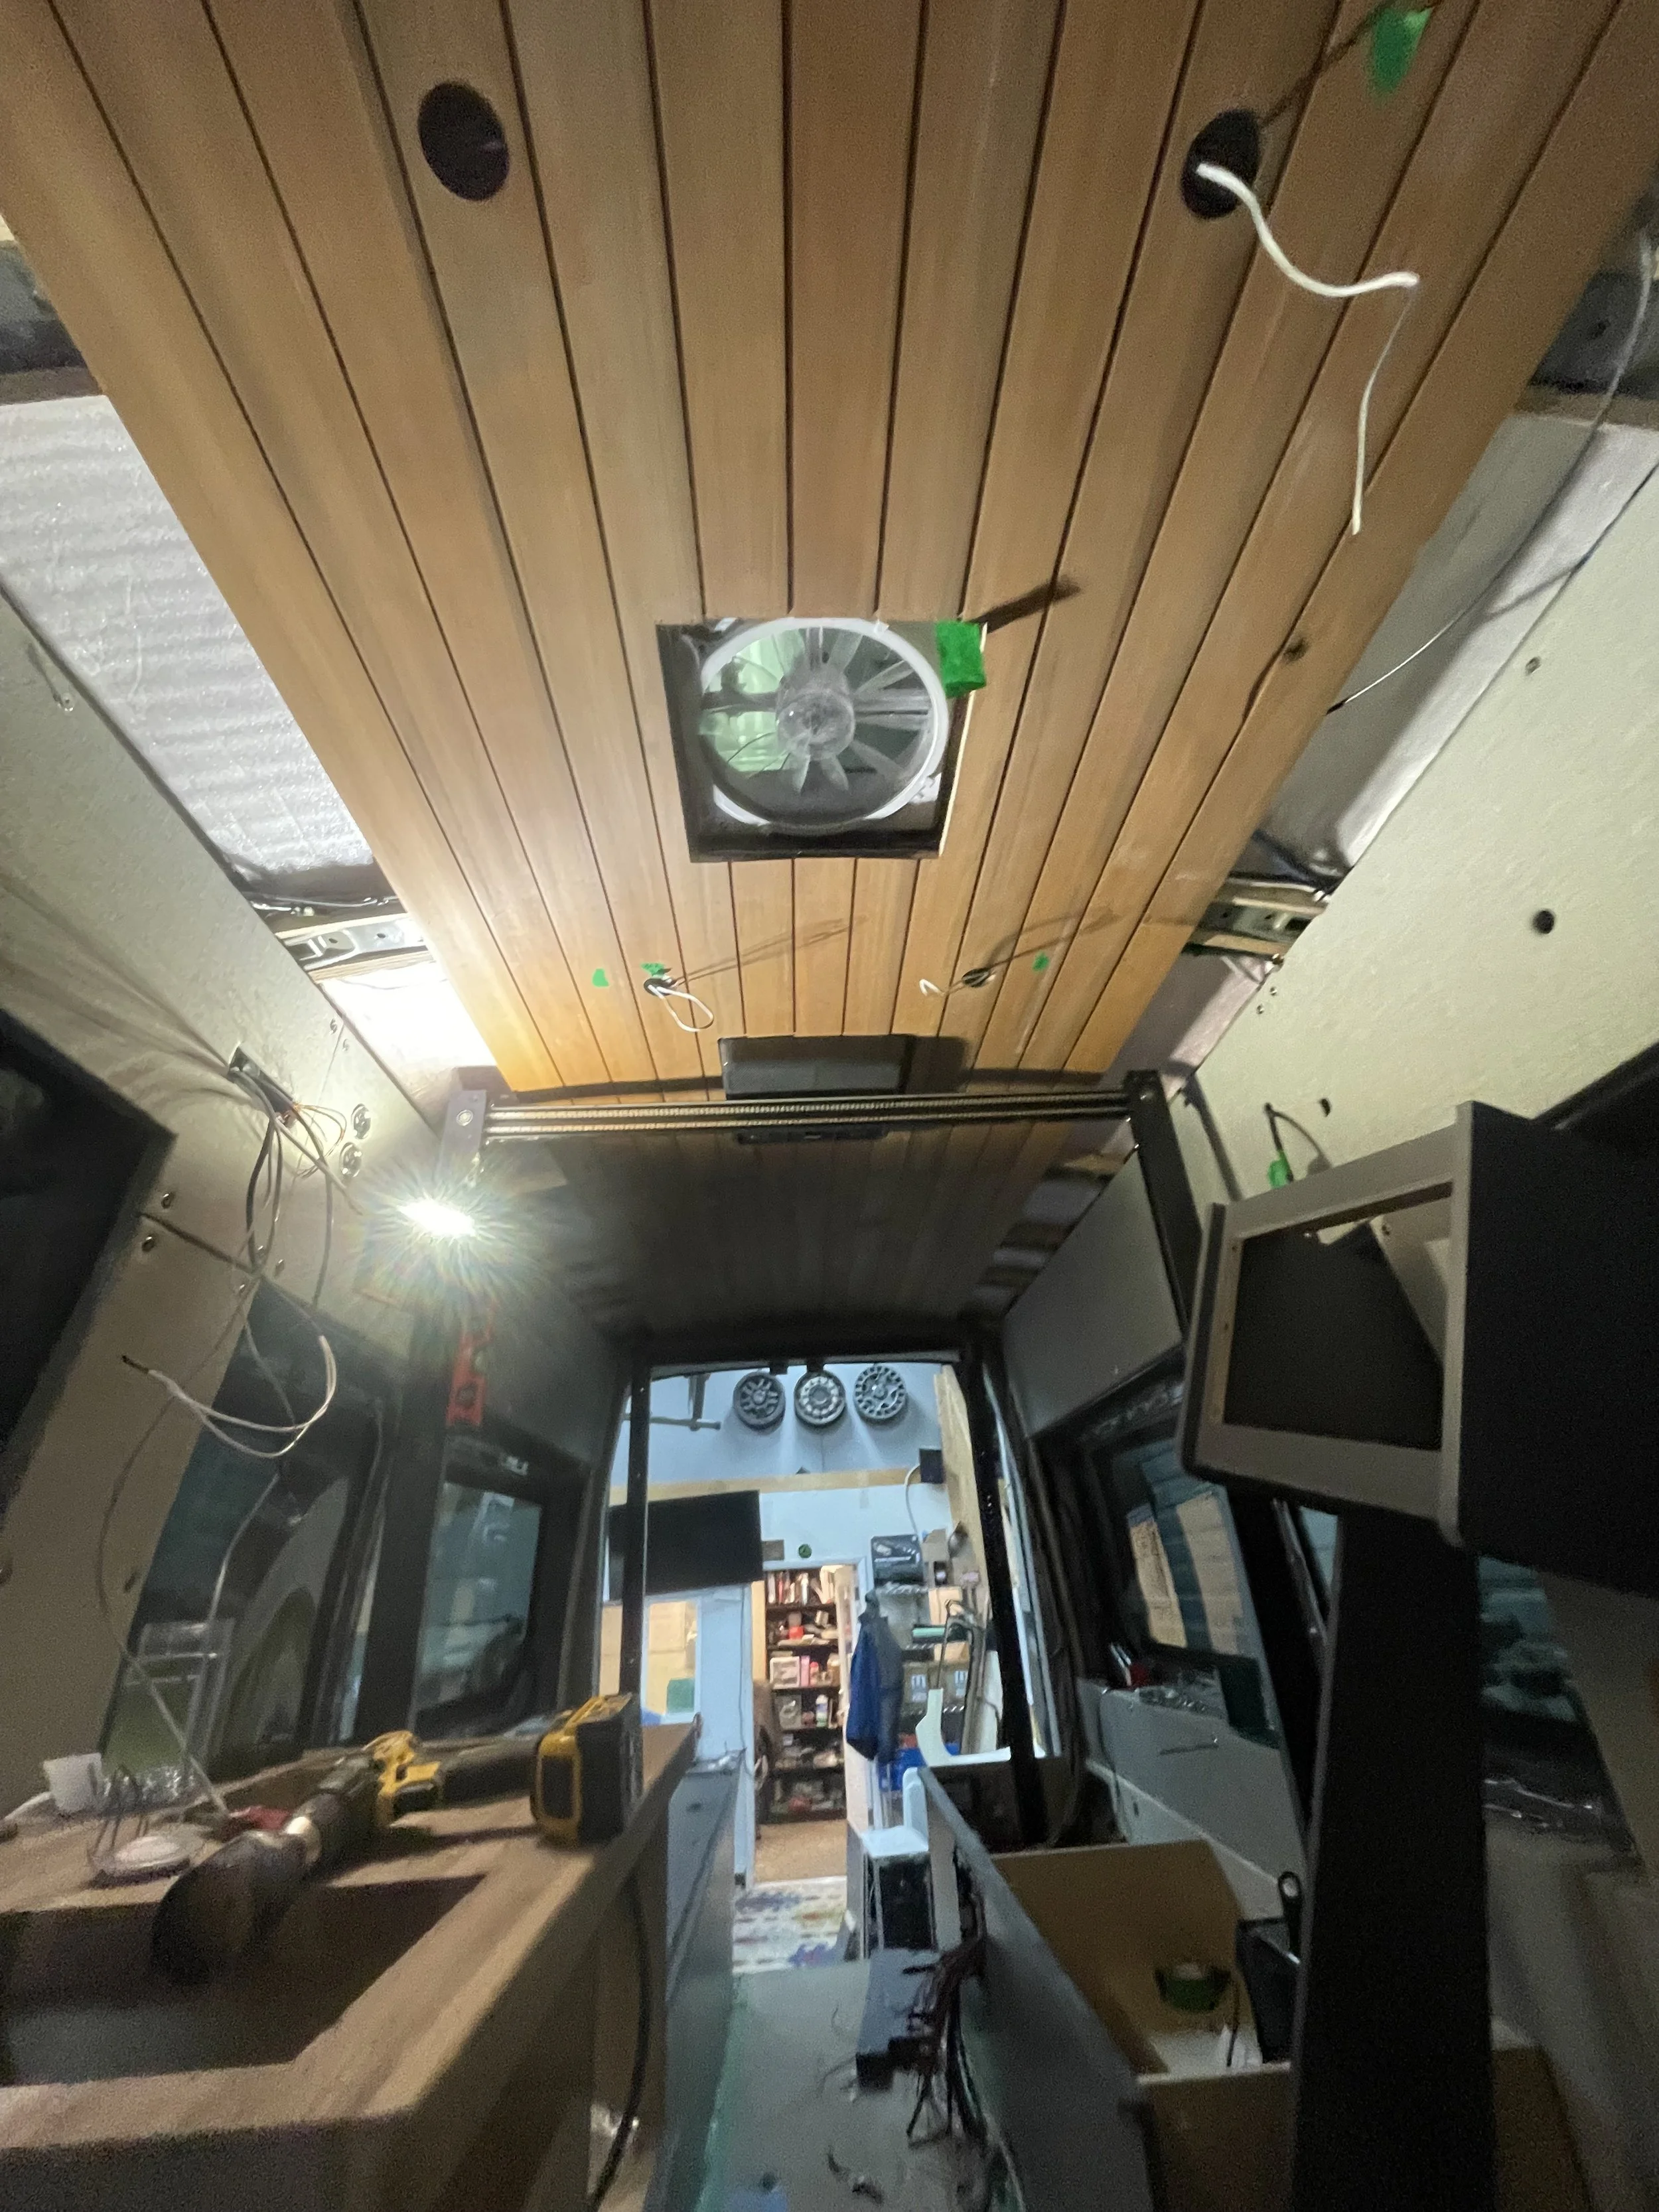
Ceiling: This client loved the feel of one of our previous builds - Jason’s van, so we went with a custom milled European Beech tongue and groove to match that van’s finish (sourced from Paxton Hardwoods).
Before we install the ceiling, we first used Varathane pre-stain wood conditioner and then stained the Beech with Varathane Special Walnut to give us the color the customer was after. We add wooden framing to either side of the van’s roof frame rails and then install our ceiling material with brads and the same Sikaflex 252 that we use on the floor for a nice seamless look with no fasteners. We fill our brad holes with matching putty and finish off everything with Oil Based Polyrurethane to seal the wood and give it a nice glossy finish. Our standard interior lighting package includes 8 of these puck lights installed into the ceiling and in this van, we added another 4 lights under the bed platform as well.
Electrical
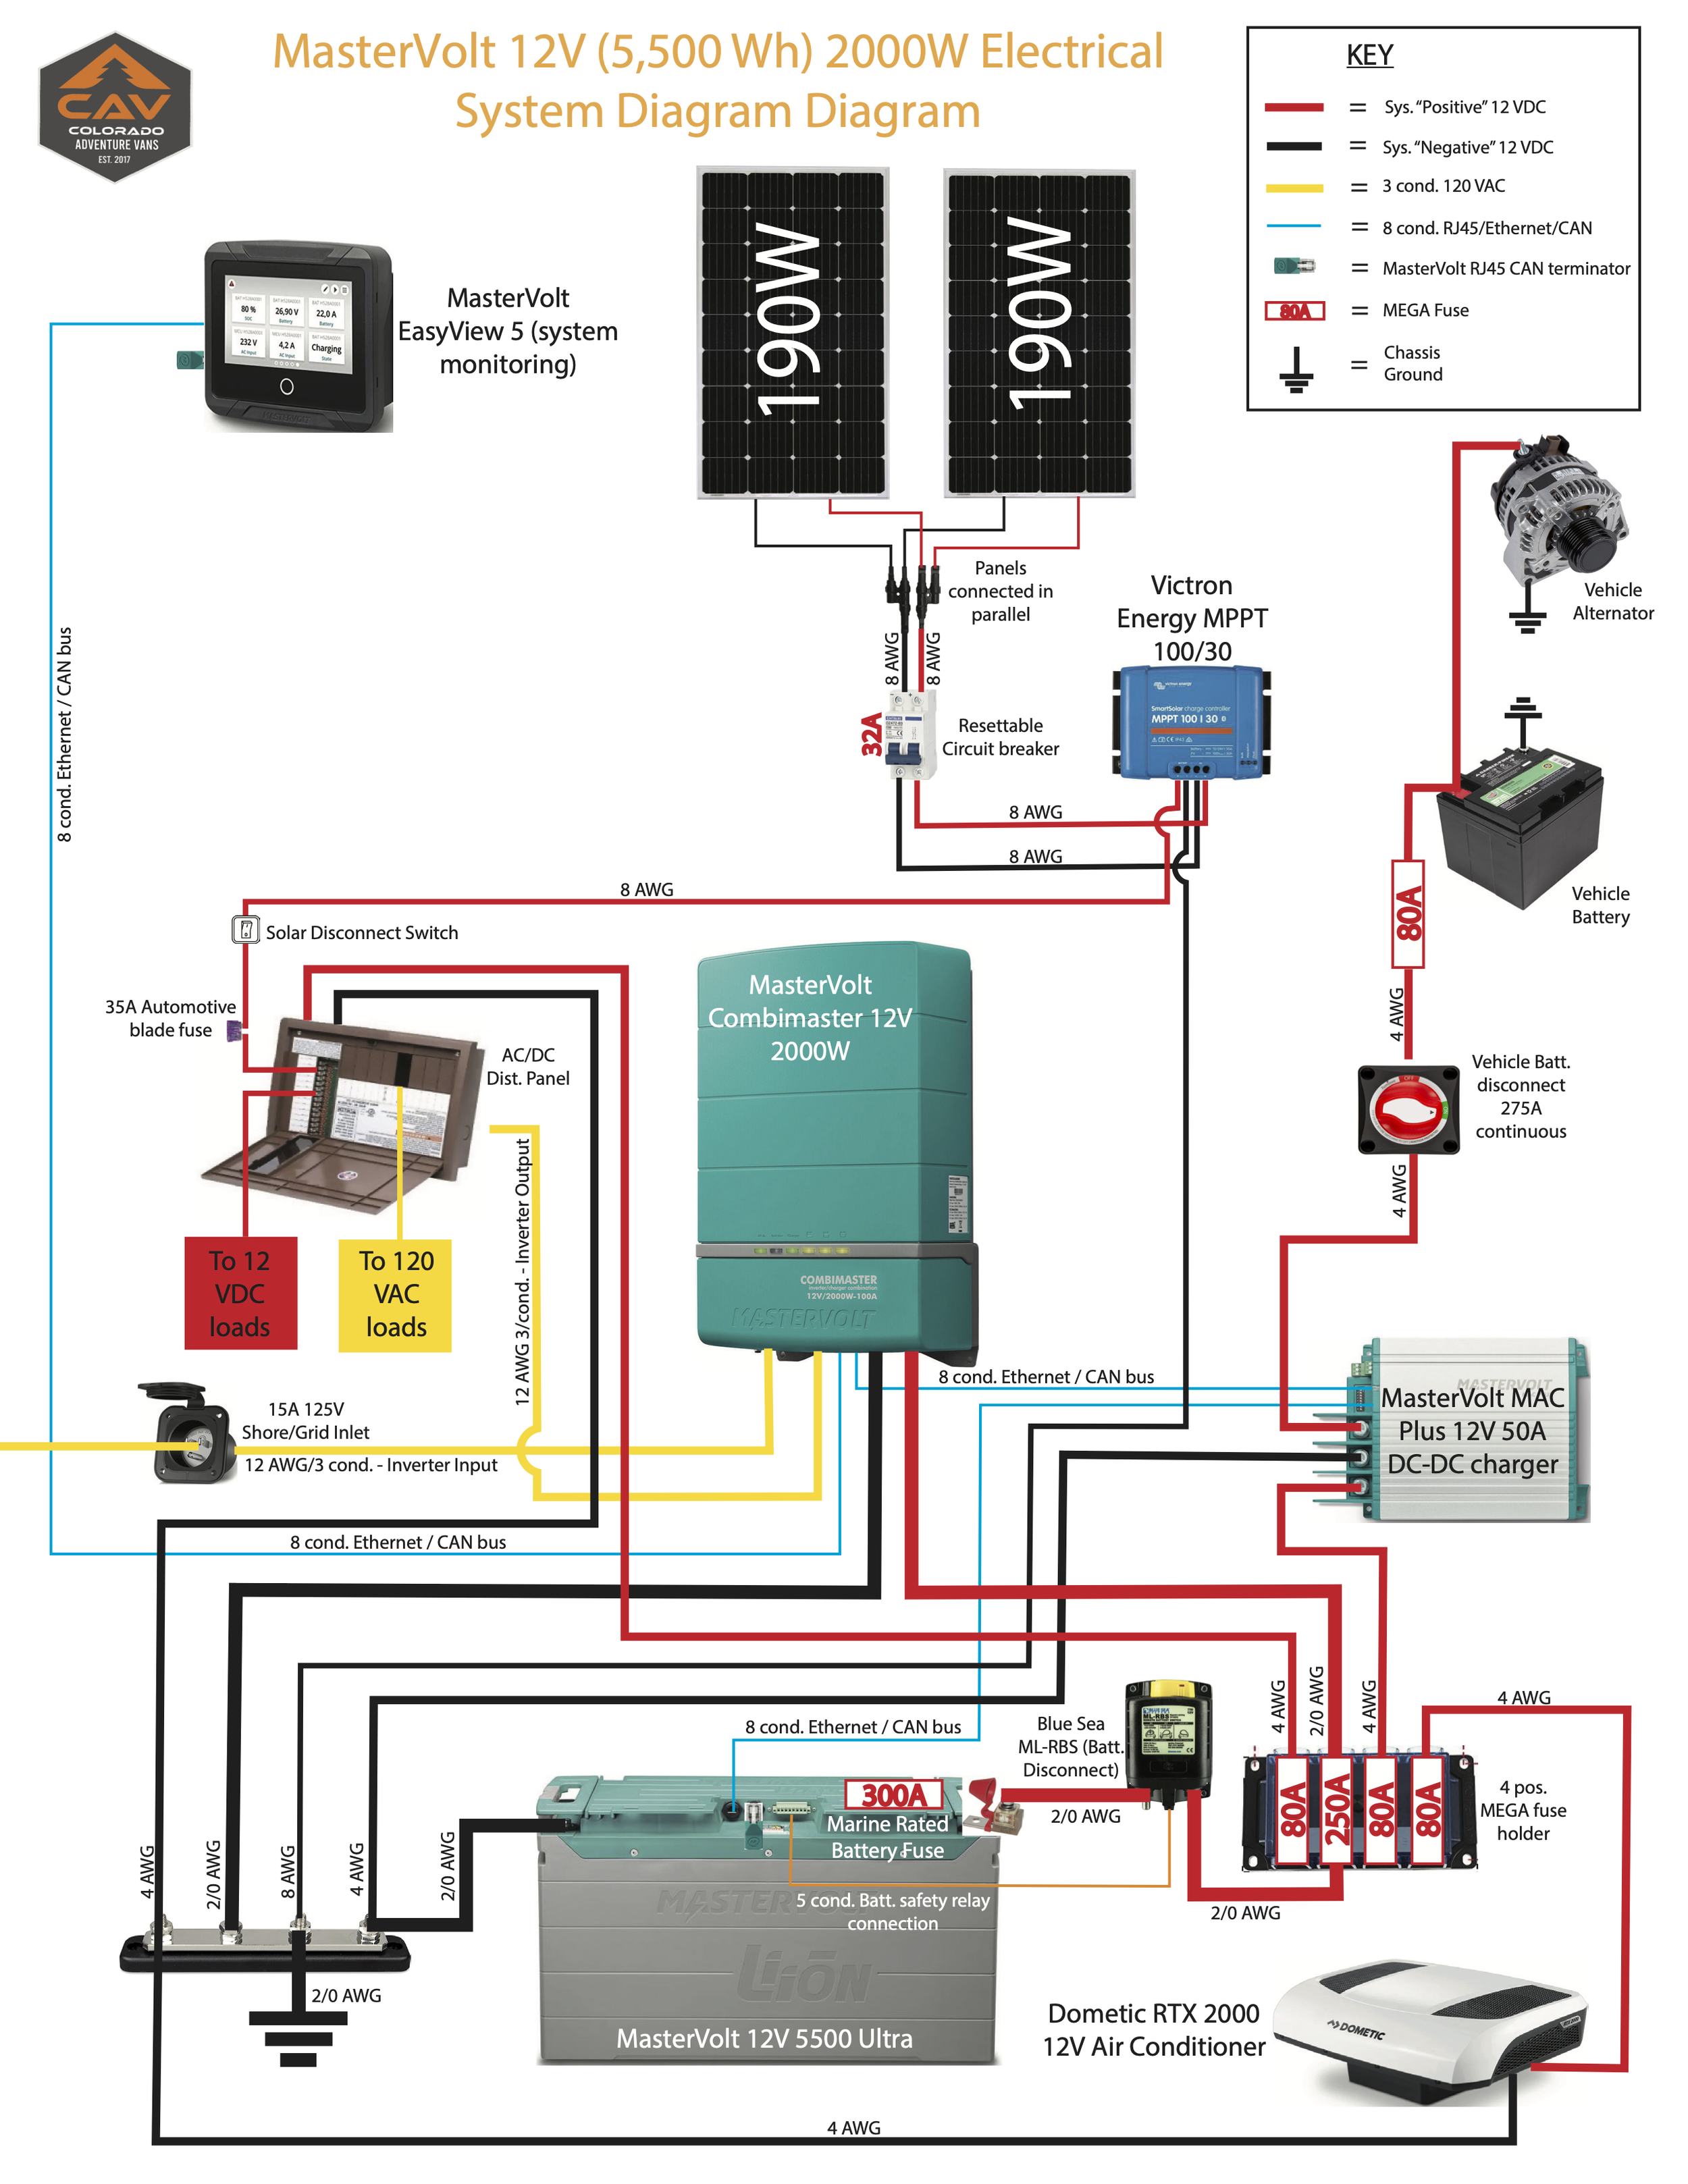
This van came to us with a Mastervolt system already installed - we integrated the existing parts with our updated layout.
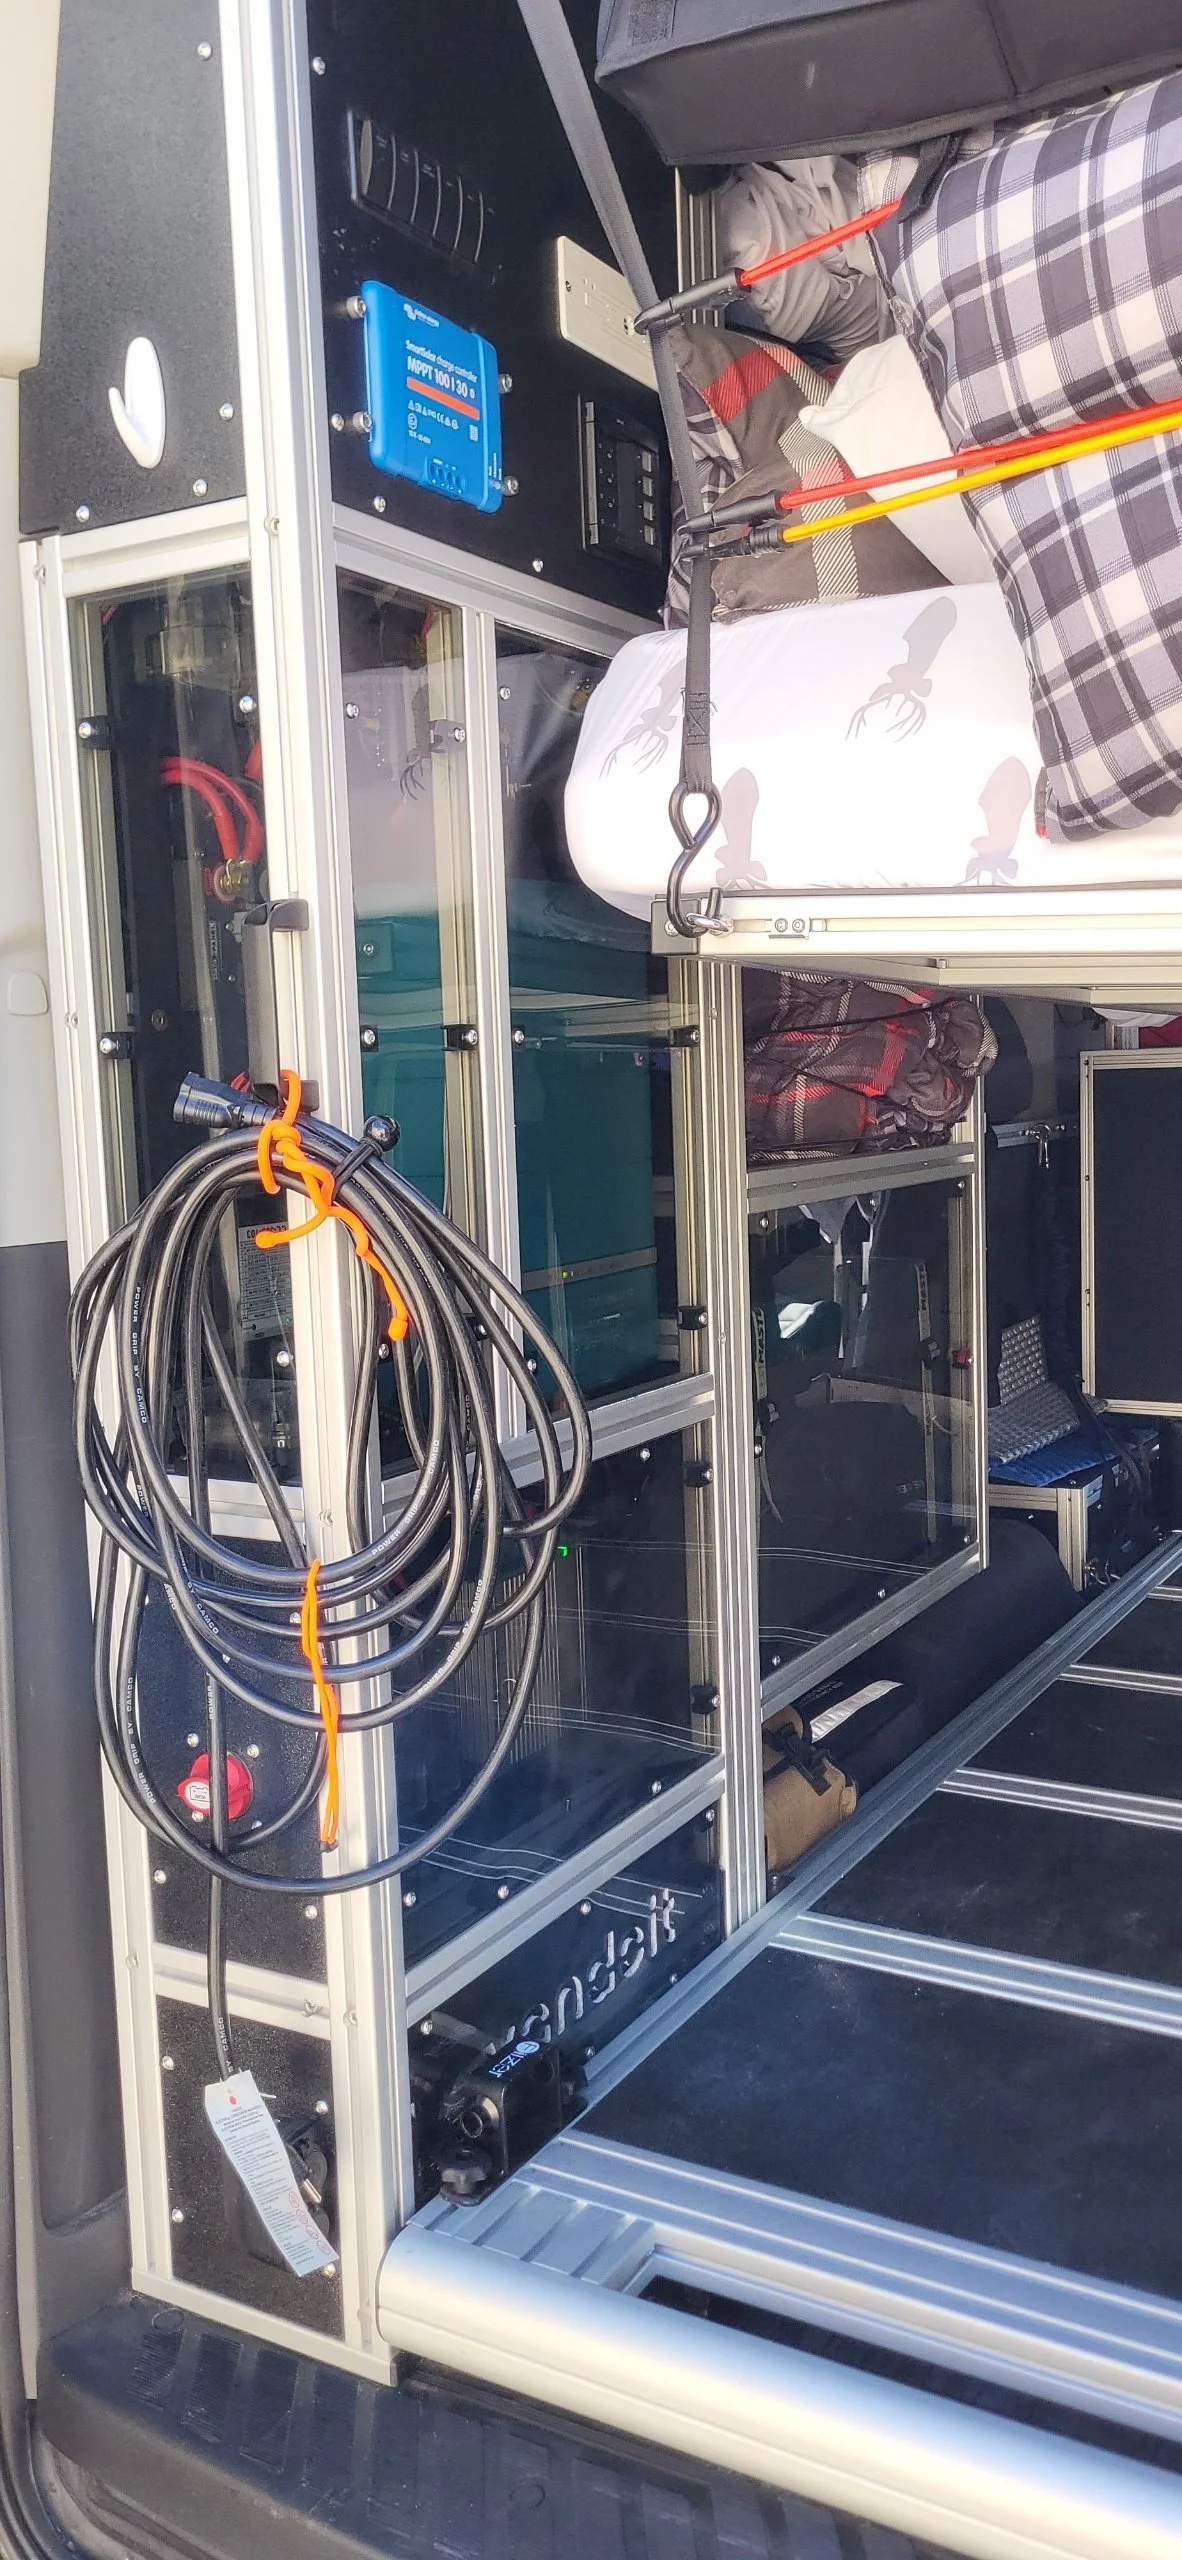
Battery: Mastervolt 12v 5500 Ultra
Inverter: Mastervolt Combimaster 12v 2000W
DC-DC: Mastervolt MAC Plus 12v 50A DC-DC
Battery Monitor: Mastervolt EasyView 5
Solar Panels: There were 380W of solar previously installed on the roof that ran to a Victron 100|30 MPPT Solar Charge Controller for charging the battery.
Power Distribution: Power distribution always starts with a main battery MRBF fuse and a battery disconnect switch. This van came with a Blue Sea ML-RBS that we reused for easily disconnecting all battery loads. After that power is distributed at the 12 VDC MEGA fuse center to all 12 VDC components.
Further downstream 12 VDC along with 120 VAC from the inverter is then further distributed into branch circuits at the WFCO WF-8930 Power distribution center to all 12 VDC and 120 VAC appliances and devices. This is where all of our fuses and breakers live.
Send an email to off_grid@coadventurevans.com if you’re interested in our help building or consulting for your electrical project
Colorado Adventure Vans is an Upfitter based in Golden, Colorado.
Building out vans since 2017, we take great care with every build in our shop. Our focus is quality, not volume, aiming our attention to detail to ensure your adventure rig is ready for anything the road throws at you.

Follow us on social media
Head to your favorite social platform below to stay up to date on all things Colorado Adventure Vans. New vans, rental destinations, & more.
Cabinetry, Layout, & Interior Design
The layout in this van emphasized seating and comfort for the whole family.
This customer wanted the option to bring the kids, so we installed the Broad Arrow folding seat with a swivel seat base to allow the seat to tuck into the wall and open up more interior space. In the back of the van we housed our electrical and plumbing systems in a custom convertible dinette/bed and installed the Happijac bed system to allow for bunk sleeping for 4 in the back.

The cabinetry was all made of Luan light plywood that we source locally from Austin Hardwoods. We laminated everything with Formica Storm Gray laminate and edgebanded the plywood to match.
Our client brought the van with a Laveo Dry Flush toilet, so we built a box around it that would serve as both an additional seat in the van and a step up into the upper bed. We had a local metal shop make us a custom pull out tray for the toilet so that we could stash it when not it use.
The van came with a Dometic CFX3 75DZ 12v Cooler that we integrated that into our galley on a slide that we sourced from DFG Offroad.
The countertop is walnut butcher block finished with a few coats of Watco Tung oil for protection. We inset an induction cooktop into the counter, and repurposed the Dometic Sink from the original build into the right side of the galley.


The upper cabinetry held a microwave, a 3rd Generation Starlink router, and plenty of storage. We used the Starlink Standard Mount from Flarespace to mount the dish on the roof of the van.
All of our cabinet doors stay open with the help of gas struts and we used Belwith Keeler leather cabinet handles for our door and drawer handles.
Temperature Control Systems
The van came with a Maxxair 7500K fan installed on the roof as well as a Dometic RTX 2000 Air Conditioning unit to keep things cool. There was also an Espar gasoline air heater installed in the midsection of the van. We moved the heater forward slightly but otherwise hooked everything back up to the relocated battery system.
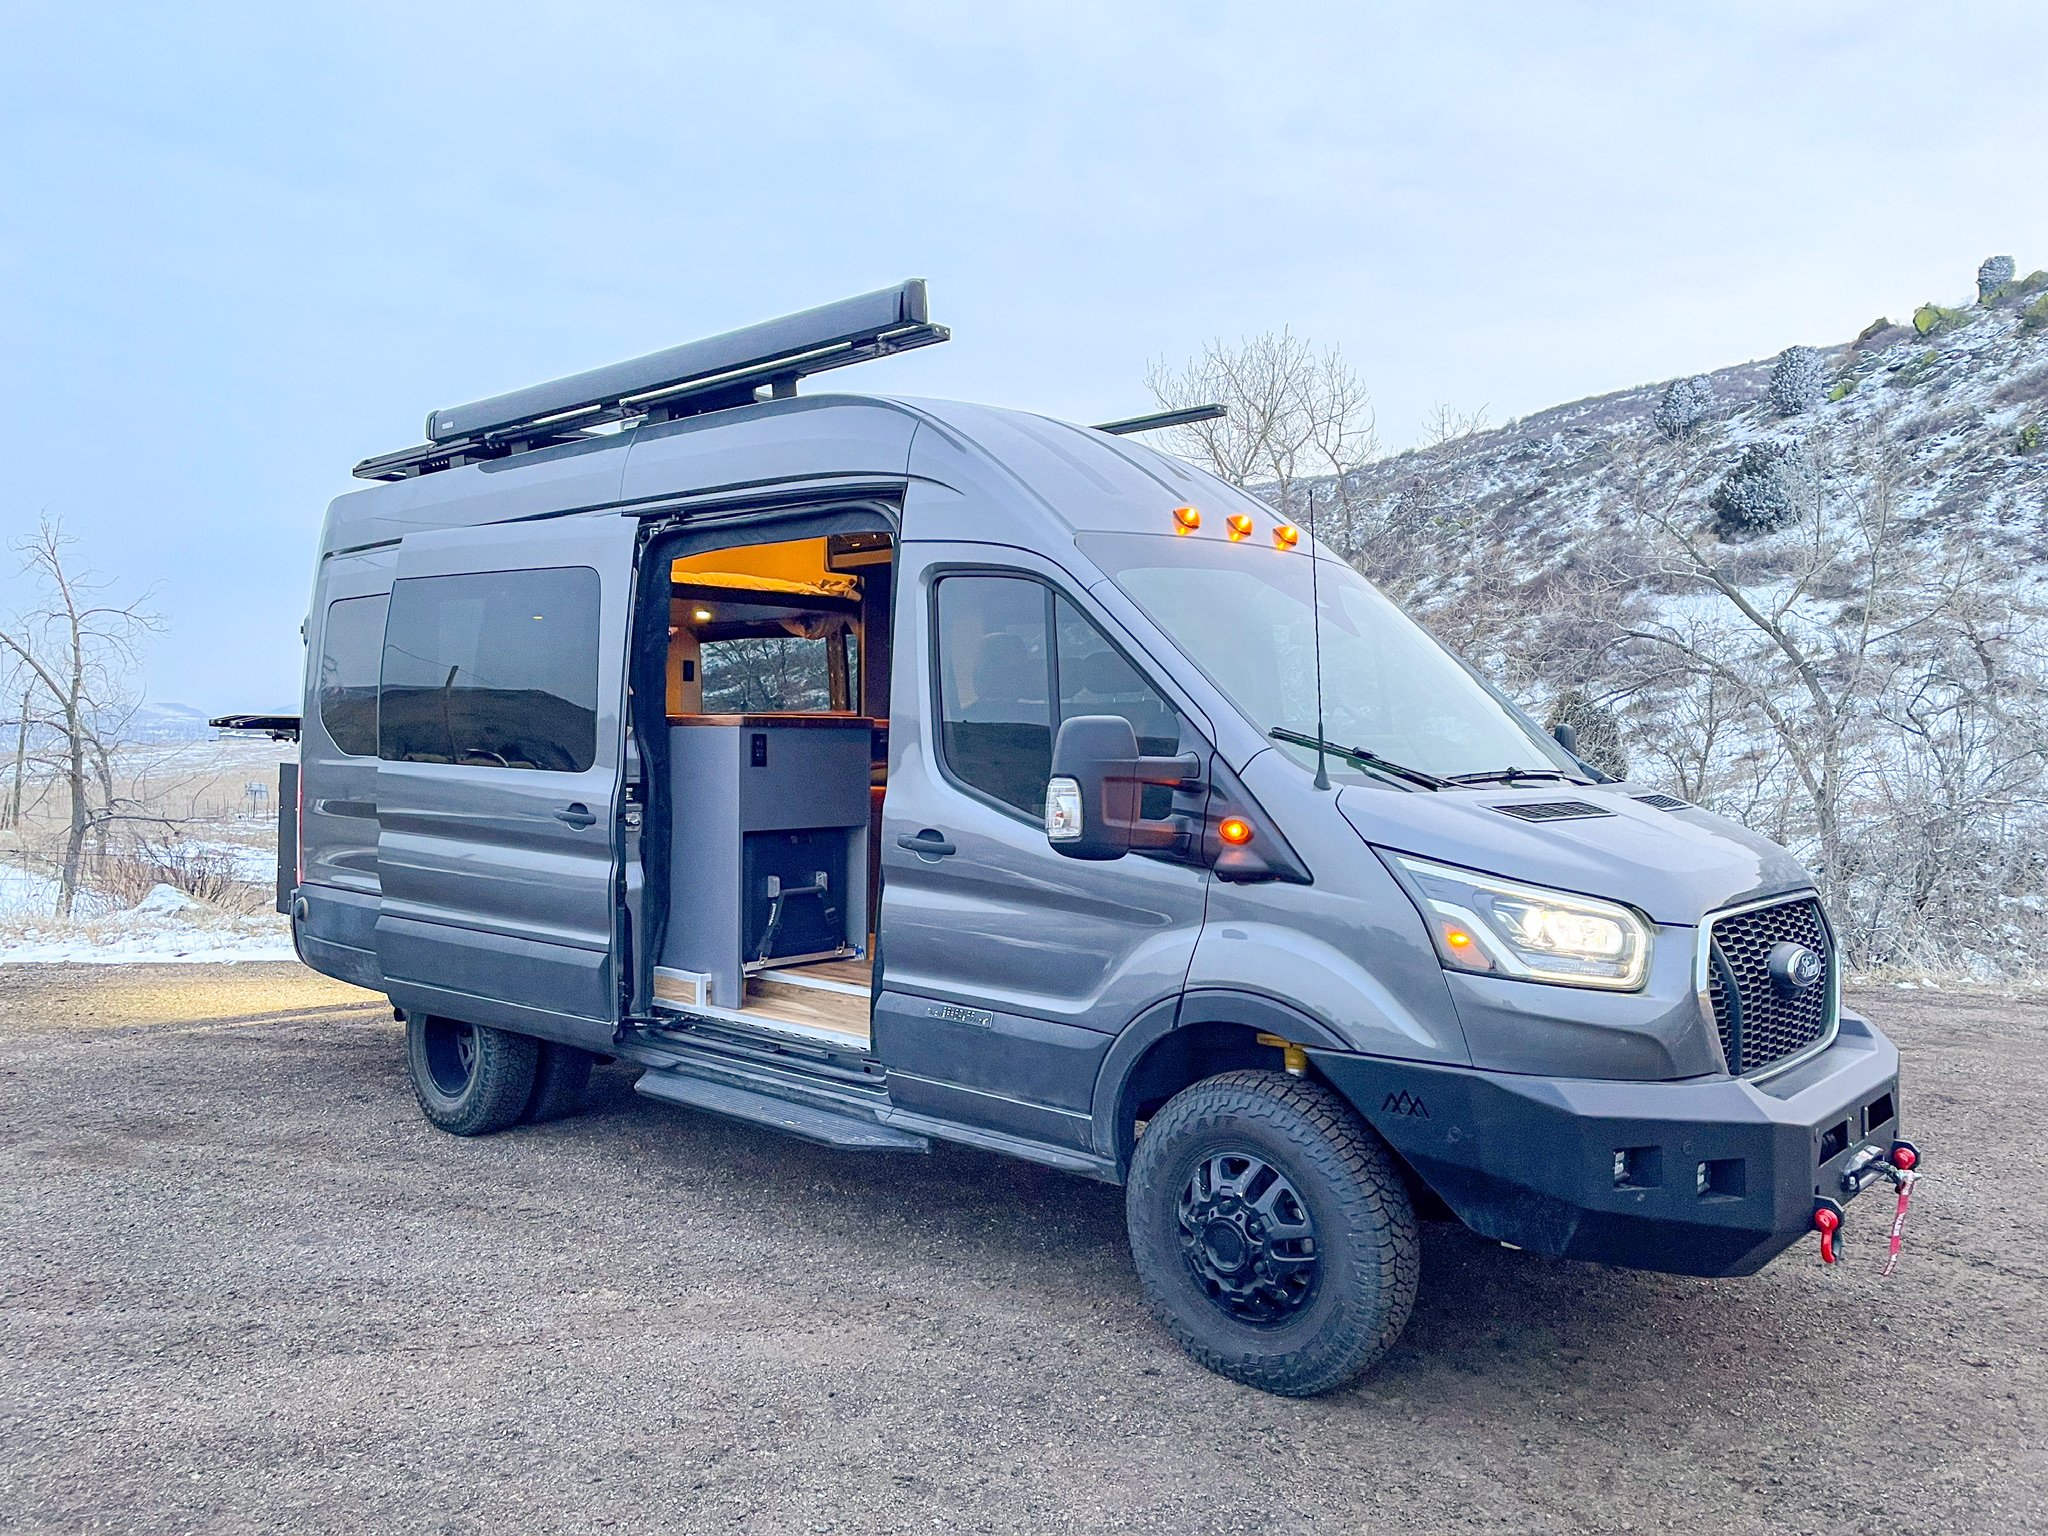
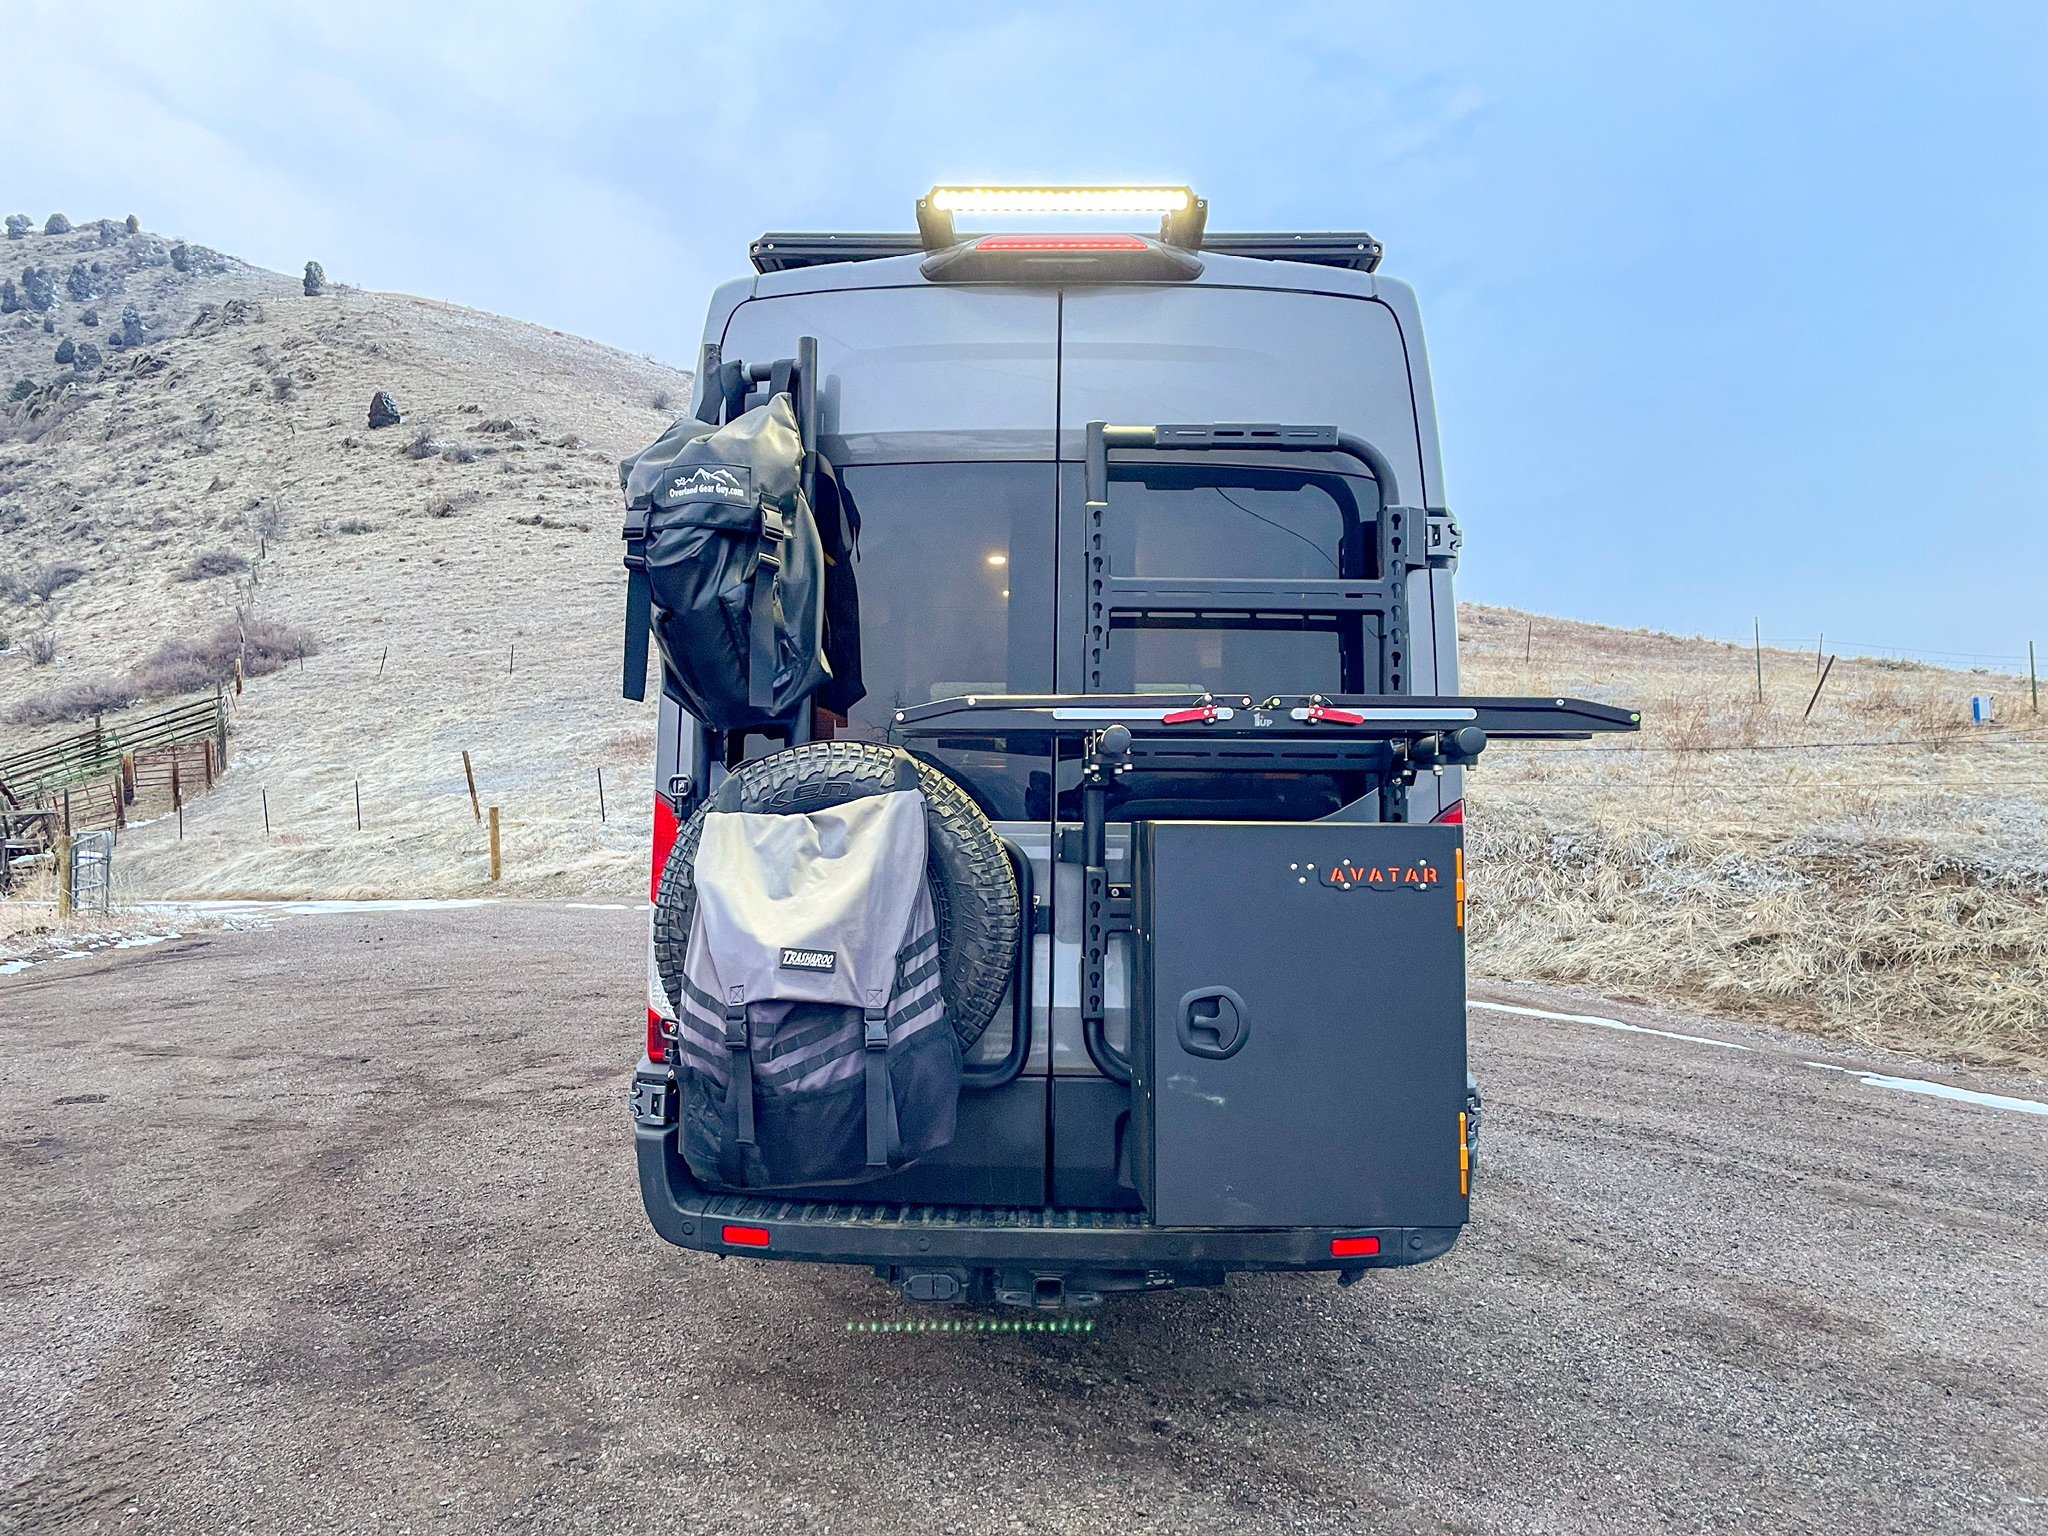
Most of the exterior build out was done prior to the van coming into our shop. The front bumper, winch, awning, tire carrier, and solar panels were left untouched. We added an Avatar Offroad Massif Carrier with bike posts, Kilo Box, and (2) 1up Bike trays. We also installed the Starlink on the roof with this convenient mounting kit from Flarespace to get our customer working and entertainment on the road.
Exterior Upgrades


Don’t hesitate to reach out to john@coadventurevans.com for DIY product recommendations, assistance with your project, or any other questions you might have. We’re always happy to help!